DCC Shuttle and Station Stop in One Module
-Runs a DCC equipped loco back and forth along a single section of track
-Optional station stop function brings the train to rest at stations along the line
-Can operate a train around a loop, stopping at stations along the way.
-Easy adjustment of waiting times, just like a DC shuttle
-Locomotive speed is set using an adjuster on the board
-Quick and easy to connect and set-up
For a long while simple shuttles have been available to model rail enthusiasts to operate DC locos back and forth along a single section of track, simply setting the waiting time using an adjustment on the PCB. We have wanted the same for DCC modellers for some time.
For the DCC modeller, automatic control often requires expensive controllers or a willingness to control the model railway using computers. Either of these can prove expensive, time consuming and complex, although for some this complexity is the very draw to this type of solution.
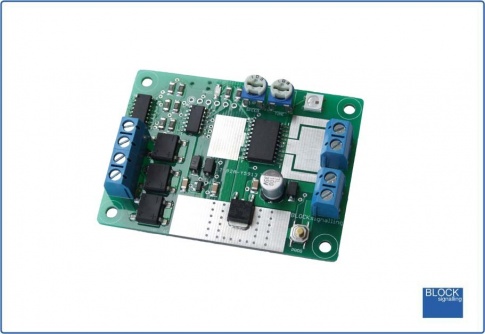
DCC modellers can now use the SDCC1 which is a miniaturised DCC command station which is dedicated to operating the shuttle train. This module is a self-contained DCC throttle, designed to operate a single loco along a section of track. Upon being detected reaching the end of the track, the loco will decelerate to a standstill, wait for a period, then accelerate in reverse. It will then run to the other end of the track and decelerate to a standstill, wait again, and then accelerate off forwards.
This action would be appropriate to single line with one train and two terminus stations.
There is also the option to add intermediate stations. In this case, as the train enters the vicinity of the station, it automatically slows to a standstill, waits a set time at the station and then sets off again. There can be any number of such stations on the single line.
The shuttle track should be isolated from any other tracks on the layout, as otherwise there is the possibility of connection between the output of the SDCC1 and other controllers.

Connecting the Unit
The track is divided up into a minimum of three sections, the main section and two ends.
The ends are formed by isolating the right-hand rail by using an insulated rail joiner, or by cutting the rail with a dremel or hacksaw. Fill any remaining gaps caused by cutting using epoxy glue to ensure smooth running. This is not necessary at the testing stage, but will ensure the final running is smooth.
The length of the end sections of the track should be sized to allow the loco to enter, be detected and to stop. Carriages with lights which draw power from the rails will be detected if they draw more than 4mA, which might be useful when the train is reversing.
It is recommended that a short section of test track is used to gain familiarity with the operation.
The track should be arranged so that no damage will occur to trains should they overrun the end of the track. Such protection could be provided by a dead section of track at the very end of the line.

If the station stop function is being used, then form isolated sections for each station. Any number of stations can be formed.
The isolated sections will need to extend either side of the platform, to allow time for the train to decelerate.
Power Supply
The module is designed for a supply voltage of 12V DC.
The module will not be damaged by reverse polarity, being connected to AC rather than DC, or an input voltage up to 35V DC or 25V AC.
The maximum output voltage is limited to 13.5V, but will normally be around 2V below the power input voltage.
Normal traction current is below 200mA for N gauge and 300mA for OO and HO gauges for the speeds shuttle trains are normally operated at.
The module can provide up to 0.5A of traction current, and a power supply with a minimum output of 0.5A is recommended for Z and N gauges, 1A for OO and HO.
Overcurrent and short-circuit protection is provided.
Emergency Stop
If you want to stop the train, either in an emergency, or perhaps to re-rail or change a loco, press the button on the PCB. Track power will be removed and the train will immediately come to a standstill.
The led on the PCB will flash 0.5seconds on/ 0.5seconds off.
To re-power the train, press and hold the PCB button for 1 second and then release.
Track Overload or Short-Circuit
In the event of an overload, causing components on the PCB to exceed their normal operating temperature, the module will shutdown until the components have returned to an acceptable operating temperature.
In the event of a short-circuit on the track, track power will be removed and the train will immediately come to a standstill.The led on the PCB will flash 1 second on/ 0.1seconds off. To re-power the train, remove whatever is causing the short circuit, and then press and hold the PCB button for 1 second and then release.
Step-by-step Connecting Up and Troubleshooting
It is recommended to trial the operation of the unit on a test section of track to see how soon a loco is detected in the station and end sections, how much track is required for the loco to reach a standstill, etc. For our testing, we use a run of track about 1.5m long, with the station and end sections 30cm long.
Do not conect the track to any other sections of track operated by another controller.
1. The locomotive DCC settings should be initially set as follows:
CV1 [Primary Address] between 1 and 99 inclusive
CV3 [Acceleration Rate] ideally below 5 initially
CV4 [Deceleration Rate] ideally below 5 initially
CV29 [Configuration Data] make sure bit 2 is set to zero to disable DC running
Higher values for CV3 and CV4 can cause slow acceleration and deceleration rates, potentially causing the locomotive to overshoot the station and end sections, despite being correctly detected.ξ Higher values for these settings will provide more realistic operation once familiarity with the shuttle operation is obtained.
The output of the shuttle is purely DCC. Any faults which cause the locomotive to revert to DC operation could cause a runaway train, so setting CV29 bit 2 to 0 will prevent this.
2. Connect power to the module. Connect a 12V DC supply. Set the SPEED adjustment to about 1/4 of a turn from fully anticlockwise. Set the TIME adjustment to fully anticlockwise.
3. Switch on the power. The led on the PCB should light for 1 second, then flicker at about 1/4 brightness. As the led is linked to the sending of DCC messages to the track, it will also flash and flicker during normal operation of the module.
4. Switch off the power and connect the continuous left rail (the one without any breaks) to the terminal marked OUT1. Connect the other rail to the terminal marked OUT2 and also insert a link between OUT2 and the COM terminal. Place a locomotive on the track and switch on the power. After a few seconds, the locomotive should move forwards. Adjust the SPEED setting to set a slow speed. Switch off the power before the locomotive reaches the end of the track.
5. If you have a station section, connect it to the terminal marked S. The sections of the track either side of the station section must be connected to the OUT2 terminal. Place a locomotive on the track so that it will move forwards towards the station and switch on the power. After a few seconds, the locomotive should move forwards. When it reaches the station section, it should come to a stop for a few seconds then move off again. Switch off the power.
6. The stopping section which causes the train to switch from forwards to reverse should be connected to terminal REV2. Again place a locomotive on the track so that it will move towards the station and switch on the power. After a few seconds, the locomotive should move forwards. When it reaches the station section, it should come to a stop for a few seconds then move off again. When the locomotive enters the end section, it should come to a stop for a few seconds, then reverse back. Be ready to cut the power in case it does not stop in time or does not reverse. Switch off the power.
7. Connect the final end section to the REV1 terminal and repeat the tests in full to confirm that the train runs as expected backwards and forwards.
8. If the train does not stop at a section, it may be running too fast to be detected before it reaches the end of the section, or the track gap may be shorted with debris or swarf.
Other Ideas
The SDCC1 can be used to provide a Station Stop on a loop.
The locomotive travels forwards around the loop, stopping each time at the station for a delay period set by the time adjustment on the module.